Organization trends are more popular than ever. Methods and ideas for tidying up are in best-selling books, highly watched television shows, and viral reels on TikTok and Instagram. So what does that look like when it comes to cannabis products? Organizing canna-items can pose its own challenges due to obstacles like legality of the plant, safety concerns around pets and children, and the shelf-life of perishable items. While it can seem overwhelming to start, organizing canna-items is all about breaking down a large project into manageable parts, whether that means working with something as small as a drawer or as large as a room. While professional organizers tend to each have our own unique acronyms for branding, we more or less all follow a similar structure.
Step 1: Put like with like
For this step, you can put your brain on autopilot. Don’t worry yet if an item should stay or go, unless it’s obviously trash. While anyone can do this step for you, it’s most helpful when the person who uses the items most is the one doing the sorting and editing (steps 1 and 2). This way, items get sorted in the order your brain thinks about them. Most things are intuitive, but not all. For example, broad categories are simple enough: All flower goes together, all concentrates go together, all edibles go together, etc. The nuances show themselves in the sub-categories. For example, I like to sort my flower alphabetically by strain names. But, maybe you like to separate your indicas, sativas, and hybrids. The choice is really up to you on this one, and a lot of it has to do with knowing what is going to be most functional for you and your space.
Step 2: Edit
For some, this step is just as easy as any other step of the process. For others, it’s the most time consuming part. This is the step where we go through each category and see if the item is still something we like, want, or need. If an item doesn’t fall into one of the “keep” categories, can it be donated? Or does it belong in the trash? An item can be donated or sold if it still has life left in it. If it’s broken or unusable, it’s definitely trash. While you can’t take your old grinder, bubbler, or most cannabis related items down to your local thrift store, it’s always possible to ask around in your 420-friendly circles to see if your items can find a new home. If you find yourself holding on to a lot of “maybe” items, make a promise to yourself to take a second edit after the first round. Keep in mind that the editing process is an iterative one. Over time, you will get better and better at being realistic about what items you should keep. This, in turn, will also translate into you being more mindful about new items that may come into your home. Do I have room for that cool new bong? Or would I have to get rid of something to make the space for it first?

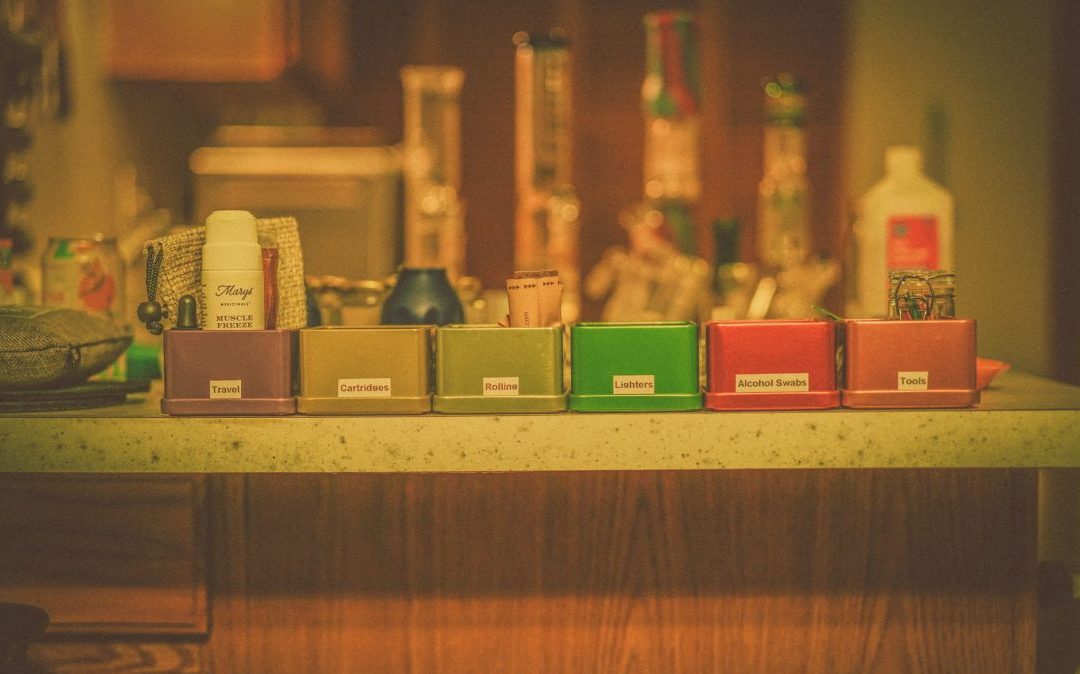
Step 3: Contain
Now that you know what you’re going to keep, it’s time for the fun part: figuring out what containers you want to use to maintain separation of your categories. Often we want to jump to this part because it can be so fun, but be sure to hold off until you are through with your editing process so you don’t end up with more containers than you need. Or, just be sure to keep the receipts! My weed storage containers consist of upcycled mason jars, tea canisters, and a set of glass jars with lids I found on Amazon. My favorite thrifted find was an old VHS tape cabinet with a lock on the door that I found for $10 and now use to store all of my cannabis related items. The lock was really important to me so I could be sure my pets, and eventually children, would never accidentally find their way into my stash. See what you have around your house and go to the thrift store if you’re on a budget. If you want to spend a bit of money on a project like this, there are a number of amazing products specifically created for storing cannabis. You can find smell proof containers, vacuum sealed and airtight jars, stash boxes, and so much more.
Step 4: Reset and Maintain
This is the key step in ensuring that your new organizational system stays organized. As convenient as it would be for things to stay nice and pretty all the time, they usually don’t when we’re regularly using them. By providing maintenance to an area, think about pressing the reset button on that space. How would it look if you hadn’t been messing with things as you needed them? Go ahead and redefine those groupings, bringing back some of the beauty and calm. A good rule of thumb: If you use it daily, maintain it weekly, if you use it weekly, maintain it monthly, and if you use it monthly, maintain it annually. I use my bong at least once a day, so I do my best to clean it well each week. The cabinet where I store my canna-items, however, usually only sees a deep clean and organization session once a year. Small routine touch ups will keep you from falling back into a position where you need to do a more involved organizational overhaul.
The last piece of advice I’d like to leave you with is this: Some systems won’t fit your lifestyle forever. Once you notice something is no longer functioning well for you, don’t be afraid to make changes. Follow these steps, being sure to complete each one before moving on to the next, and you’ll be able to tackle any project, big or small.

The Classic Method
Cover the openings in your piece with your hands. A rubber wine stopper also works great for closing off the downstem if it’s a bong. Then, give your piece a few good shakes until all the grime has been worked off of the sides.
Finally, rinse your piece several times to get out any residue from the rubbing alcohol. It is not only unpleasant, but also dangerous to inhale vaporized alcohol so this is a vital step. Once you think it has been rinsed well, fill it with cold clean water as you normally would and give it a test draw. I like to give one extra rinse to be safe, but you’ll be able to taste the alcohol if any hints of it remain. Now, enjoy a clean hit off your freshly cleaned piece!
The Laundry Detergent Method
Powdered Tide has quickly become popular as an all purpose cleaner. A small amount (about a tsp), added to a gallon of very hot water creates a great cleaning solution that is tough against many forms of grime. Luckily, it also works on glass! Simply fill your piece with as hot of water as you can stand to touch and add a generous teaspoon of powdered Tide. If you have a rubber wine stopper to close the opening for your bowl, you’ll be able to fill your water pipe up to the rim.
Now, let the solution sit and do its magic. I leave mine for 20-30 minutes and then all you need to do is rinse your piece well with the hottest water your faucet will give you. You’ll be able to see the bubbles working the resin off the sides of the glass. Plus, you don’t have to do all that shaking of your piece like you do with the salt and alcohol method.
Once you think you have rinsed out all of the powdered Tide solution, fill your piece as you normally would with cold, clean water and take a test draw. If your water produces bubbles, you need to rinse your glass more thoroughly. Once your water no longer produces bubbles, it is good to go!
This method is great when there’s a shortage of rubbing alcohol, and it feels like a less wasteful method overall. Plus, it takes less effort!
*Must be powdered Tide. The liquid laundry detergent does not work the same way.
Tips for Cleaning Your Cannabis Pieces
Cleaning your piece once it gets dirty definitely isn’t the exciting part of using cannabis products, but it is a necessary one. I don’t know about the rest of you, but I don’t enjoy a hit of my bong if it’s dirty. Here are a few approaches to keeping your glass and silicone pieces clean using products you probably already have around your house.
Powdered Tide has quickly become popular as an all purpose cleaner. A small amount (about a tsp), added to a gallon of very hot water creates a great cleaning solution that is tough against many forms of grime. Luckily, it also works on glass! Simply fill your piece with as hot of water as you can stand to touch and add a generous teaspoon of powdered Tide. If you have a rubber wine stopper to close the opening for your bowl, you’ll be able to fill your water pipe up to the rim.
Now, let the solution sit and do its magic. I leave mine for 20-30 minutes and then all you need to do is rinse your piece well with the hottest water your faucet will give you. You’ll be able to see the bubbles working the resin off the sides of the glass. Plus, you don’t have to do all that shaking of your piece like you do with the salt and alcohol method.
Once you think you have rinsed out all of the powdered Tide solution, fill your piece as you normally would with cold, clean water and take a test draw. If your water produces bubbles, you need to rinse your glass more thoroughly. Once your water no longer produces bubbles, it is good to go!
This method is great when there’s a shortage of rubbing alcohol, and it feels like a less wasteful method overall. Plus, it takes less effort!
*Must be powdered Tide. The liquid laundry detergent does not work the same way.
The Vinegar Method (for silicone pieces)
Vinegar is an acidic liquid that is great at neutralizing alkaline odors. Letting vinegar sit in your silicone piece (for 30 minutes up to a few hours) will help neutralize all those stinky smells that get trapped in the more porous material. You can also use kosher salt to add some scrubbing power to your solution.
If you have resin that is really sticking on to your piece, put it in the freezer for a few hours. Once it is frozen, you can gently tap it against a hard surface and the stuck on gunk will break free.
As with any cleaning method, be sure to rinse your piece thoroughly before using it again. Once you think it looks clean, do a test draw to check for any lingering vinegar tastes. Then, enjoy that odor-free hit from your freshly cleaned silicone piece.
Photographs by Matt Ferro

Kirby Miner is a house manager and professional organizer living in Colorado. She believes that all things can be organized no matter how big or how small. She also believes in the benefits of plant medicine and is proud to be helping normalize it's use. When she isn't helping organize homes, Kirby can be found exploring the front range with her husband, Nick, and their two pets.